

External Angle Beads
BACK TO TIPS MENUExternal Angle Beads are the most commonly used angle in plastering. Proper installation can make a job look great or very ordinary. I am very particular about getting externals angle beads, plumb, straight and square. These tips are to help you achieve a high quality finish for your job. There are 6 basic fixing methods:
Common PointsThere are several factors common to all fixing methods to consider when installing plasterers external angle beads.
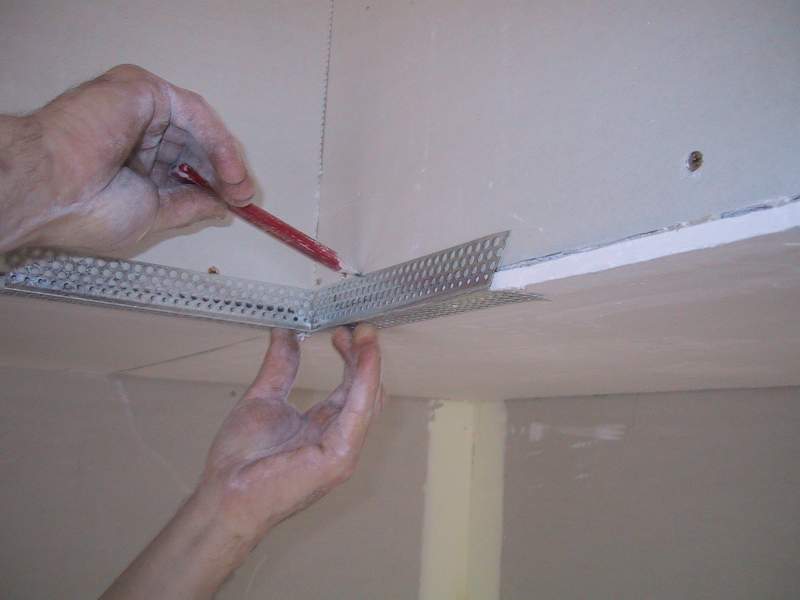
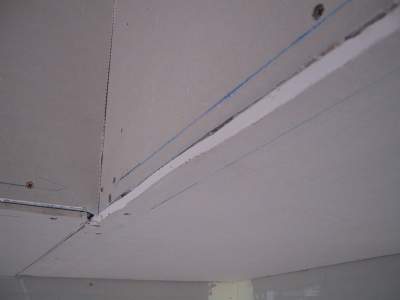
Vertical straightness can be achieved by using a straight edge, or chalk line. A good eye is not the best method! If your framing is already plumb, using a chalk line is a good way to get the external bead straight. Take a small off cut of external bead and gently hold at the top so it sits square and there is equal filling required either side. Take a pencil and mark each side. Do the same at the bottom and flick a line between the marks. The external bead when fixed each side up to the line, will result in a perfectly straight external corner. The chalk line method, is also very good to use if your frame is bowed in or out. If you have bowed frame and use a straight edge, it can be very difficult to get the angle bead straight, because when you fix it, it will tend to pull in and buckle the edge, so it cant be filled.Where a lot of filling is required, the external angle bead should be "pinched" in, so the outer edge can sit against the board. If you have a chalked line to follow the job is made a lot easier. A common error when fitting an external angle bead, is pushing it on too tight. This opens the external bead up, causing the outer flange to stick out, leaving no coverage of the metal. When this happens the metal sticks through the plaster, it is impossible to fill. Another problem is a hair line crack can develop later if filling is not sufficient. Often external angle beads are open slightly at the ends, therefore prior to installing just slightly pinch each end to close the external bead a little. Use snips to cut the ends on a 450 angle, this also prevents the angle bead opening up. Regardless of the installation method you adopt, you will need to check their is sufficient filling at the top, middle and bottom. Use the edge of a trowel, or blade, to check the amount of filling required, ensure there are is metal, or fixings, protruding.When two external angle beads are close together, such as the end of a nib wall, you will need to make sure the angles are square at the top and bottom. This can be quite tricky if the stud is twisted or bowed. You will need to use a fixing method that will allow easy adjustment, after installation. The staple method, or pinning then using a plaster adhesive, methods are the best. Stop up external angle beads using a three coat system similar to joins. Special care must be taken at the top, bottom and middle. Often an external angle bead will have more filling at the top or bottom, due to leveling etc. If not filled correctly, un-sightly gaps or bows can occur at the top of architraves, or under the cornice. These areas will need to be filled out wider than normal, to prevent this problem. In the middle area, a problem can occur, where the wall join meets the external angle bead. Plasterers will often leave a bump or hollow at this point. After top coating, run your hand over this area, if needed apply another layer of top coat, that will even out any bumps or hollows. BACK TO TOPNailingNailing is the most common method for a DIY plasterer to fix an external angle bead, however, it is the worst method for getting a straight angle corner. To get an external angle bead straight using the nailing method, first pin the external in place using nails. Adjust for level and straightness. Pin each side, at the top, bottom, center and between the top/center and the bottom/center. The nail can be easily pulled out to make adjustments. Hammer the nails home, starting at the top, work both sides to the bottom. You should check the straightness each nail you hammer home. Care must be taken to keep the nail going straight. Do not nail them in to firmly, as this will pull the angle bead out of line. StaplesStaples are the most preferred method of fixing external angle beads by plasterers. You will need a strong staple gun. The external can be held in place using a straight edge, while you tack the top, bottom and center of each side in turn. Staples can then be place all down the angle, without disturbing the straightness. This is a lot quicker method. Problems many beginners have, is lining up the edge of the staple with the edge of the hole in the external angle bead. If not lined up properly, the external may slip out of line, the staple is not always strong enough to hold, when it straddles the hole. Staples can easily be removed using a pointed object,(trimming knife blades work well). This allows for easy adjustment if required. BACK TO TOPPlaster Adhesive (pinned)Plaster based adhesive method of fixing an external angle bead is not often used. However it's a much better method than nailing when you don't have a staple gun. Most types of plaster can be use as an adhesive, however I find cornice adhesive works best as it sets quicker. This method, allows you to make any adjustments, by using nails to temporary pin the external angle bead in place, prior to applying the adhesive daubs. Mix up the plaster fairly stiff, trowel on spots of adhesive beside each nail, about 3 inches square is enough. When this has set, pull the nails out and you have a perfectly straight external corner.  Before installing a plasterers external angle, cut back the ends on a 450 angle  Plasterers external angles sometimes open up on the ends. Therefore pinch the ends slightly to close up the angle a little.  Pin the angle in position using temporary fixings. The fixings are only into the plasterboard not the stud behind.  Using a staight edge, straighten the external by removing and replacing the temporary nails as required.  Once the external angle is pinned into position and straight, using a plaster mix wipe on daubs of plaster beside each temporary nail.  When the plaster has set remove the temporary nails and scape back the plaster. The external will be perfectly straight and ready for the 1st coat. Plaster Adhesive (not pinned)This method can be very quick, it does a good job, provided the framing is reasonably straight. Not often used by plasterers, as they prefer staples. Cornice adhesive is best plaster to use, as mentioned above. The mix should be fairly stiff. Prior to placing the external bead in position, apply daubs of adhesive at roughly 400mm centers, from top to bottom on each side of the wall. Daubs should meet in the center and be well proud of the wall. Simply press the external angle bead gently into place by hand, wipe off excess adhesive, then using a straight edge, finally position the external bead straight and plumb. Gently wipe of any excess adhesive. This is very easy and much better than nailing. Before installing a plasterers external angle, cut back the ends on a 450 angle Plasterers external angle bead sometimes open up on the ends. Therefore pinch the ends slightly to close up the angle a little.  Place opposing daubs of plaster on the external corner about 400mm apart.  Apply the plaster adhesive daubs up the entire length of the external angle bead.  Position the external angle bead over the plaster adhesive.  Gently press the external angle bead into position.  Clean off excess plaster adhesive.  Use a straight edge to press the external firmly into the adhesive. If the external angle bead does not stay firmly in place, you may need to put the odd clout in to pin it in position until the adhesive has set. Spray On AdhesiveThis method is quick, but does not allow for a lot of adjustment or straightening. Preferred by some plasterers, however I would not recommend it to the handy man. Spray on adhesive can be purchased at most plastering outlets. It is sprayed onto the inside of the external angle bead. The external angle bead is then pressed into place, the adhesive sets fairly quickly, so adjustments must be made immediately. Adjustment is severely limited, where there are twists or bows in the framing. This is not my preferred method of fixing. CrimpingA Crimping tool is required for this method. The tool is placed over the top of the external angle bead and hit with a mallet, this punches the edge of the external angle bead that creates a crimp that imbeds into the plasterboard. Although a time saver it does not allow for proper adjustment. The crimps can be lifted out and tapped back into a different position. Ok for minor adjustment, but can make large adjustments difficult. Not recommended for the beginner. Only an experienced plasterer should;d use this tool, however I am very critical when it comes to straightness of external angle beads. Joining External Angle BeadsParticular care needs to be taken when joining external angle beads on a long run like a bulkhead. The main problem is that the end of external angle beads are often slightly more open. This tends to make external angle bead dip in where it is joined. It does not take much to make the join look bad. To eliminate this problem the ends to be joined should be slightly pinched in to close the external angle bead. Cut the end back on a 450 angle, but not right to the point of the external angle bead. Start about 10mm in from the point of the external angle bead, it make it easier to line up the join exactly, yet stops the end from opening up. Joins in external angle beads should be lined up with a chalk line to get a great job. BACK TO TOP Getting long runs straightThe best method of getting a long run straight, is to use a chalk line to mark both sides of the external angle bead along the entire length. Use a short length of external angle bead gently placed at each end, (being careful not to close the external), when positioned, mark each side with a pencil. Flick a line between marks.
Problems will arise when the framing bows outward, not allowing you to press the external angle bead back to the line. To fix this, using the short length of external, check that the edges can touch the line all along. If you find a spot where it won't touch, mark each side with a pencil. A new line can now be flicked, adjusted each end by the difference, leaving you with a dead straight bulkhead. If there is a lot of difference you may need to pinch the external angle bead closed, to fit it properly. Corner JunctionsLining up the junctions of a corner can be very frustrating, particularly where you have to adjust the external angle bead for straightness or plumb. These situations occur when creating a square opening, or, intersections of a bulkhead. Without exception, I use the chalk line to get these corners lining up perfectly. I use the same process described above, except the short length of external angle bead is cut in the middle, right up to the point without cutting it right through. Then fold it back, either for an internal or external corner junction. Hold into the corner and mark both sides. If and adjustment has to be made, as described above, the adjustment must be made on both sides. Use the short length again, re mark the line adjusting for the difference , this will ensure the corner will match perfectly both sides.
|


